Understanding Your Mihogo's Integrated Lighting System
Before adding aftermarket accessories, it's important to understand what lighting features your Mihogo e-bike already includes. Modern Mihogo models come equipped with sophisticated lighting systems designed for maximum safety and visibility.
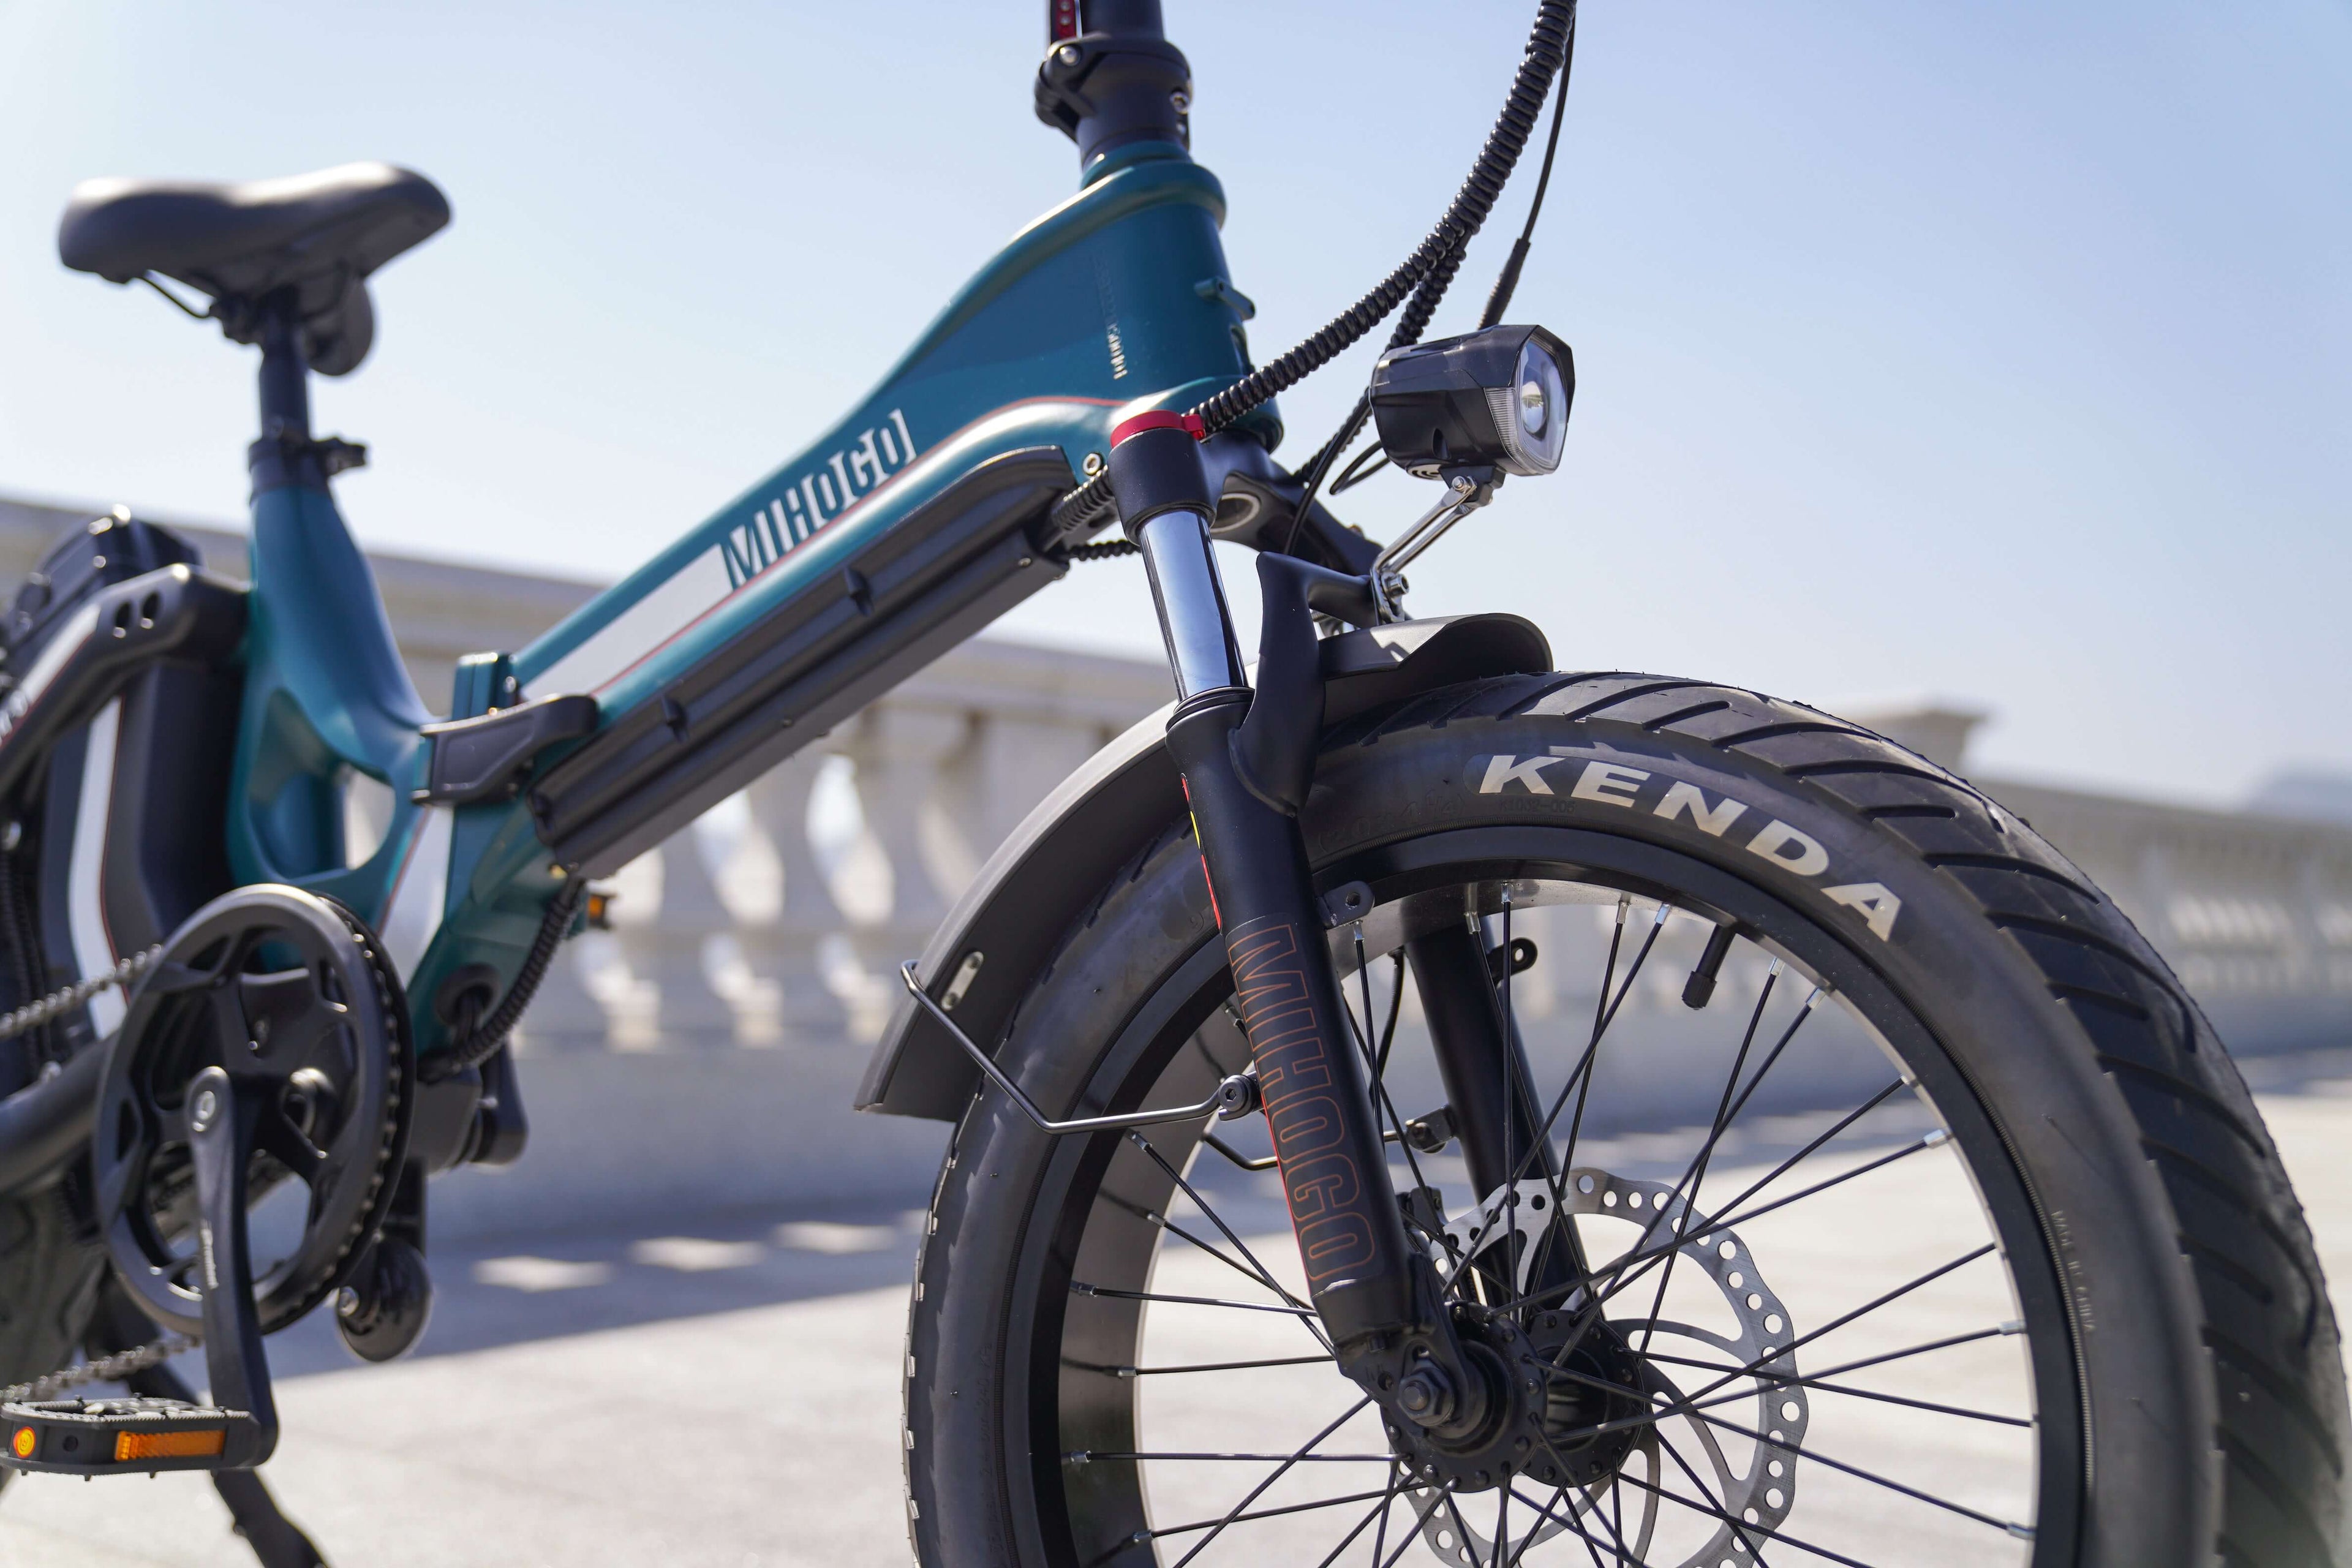
Mihogo Air Max Smart Lighting Design: The MIHOGO AIR features front dual light heads for night riding, which increases the effective range by 57%. The rear frame lights on both sides are designed with 15 inches embedded LED lights for day riding, and the taillight is integrated with embedded LED lights, providing comprehensive 360-degree visibility.
Standard Mihogo Lighting Features: Mihogo's fat tire e-bikes already come equipped with dual fenders, dual lights, and a robust rear rack, among other accessories! Most models include:
- Integrated front LED headlights
- Rear LED taillights with brake light function
- Side reflectors for enhanced lateral visibility
- Smart app connectivity for remote light control (select models)
Legal Requirements and Safety Standards for E-bike Lighting
Understanding lighting regulations is crucial for safe and legal riding. According to the Road Vehicles Lighting Regulations, it's a legal requirement in the United Kingdom to have lights on your bike and pedal and rear reflectors after sunset. The lights must be mounted up to 150cm off the ground and be facing forward or rearward.
US Federal Requirements: US bike light laws vary state by state. But typically you must have the following between sunset and sunrise or in low light conditions: A white front headlight visible from a minimum of 500 feet away and a red rear reflector visible from a minimum of 600 feet away.
2025 E-bike Specific Regulations: California laws now require proper lighting and reflectors, especially for night riding, with red rear reflectors or flashing red lights visible from 500 feet now required by law. Many states have adopted similar standards, making proper lighting installation essential for compliance.
Model-Specific Installation Guide
MIHOGO ONE Utility EBIKE Installation
The MIHOGO ONE's utility design makes it ideal for additional lighting accessories. Its robust frame and dual battery system can power extended lighting setups.
Installation Steps:
- Assess existing lighting: The ONE comes with integrated front and rear lights
- Additional front lighting: Mount supplementary lights on the handlebar using the 640mm width for optimal spacing
- Utility lighting: Install cargo lights on the rear rack for enhanced load visibility
- Power connection: Utilize the dual battery system for consistent power supply
Recommended additions:
- Handlebar-mounted spot lights for enhanced forward visibility
- Side-mounted safety lights on the cargo rack
- Under-frame strip lighting for increased ground illumination
Mihogo Mini Compact Installation
The Mini's lightweight 19kg design and foldable nature require careful consideration for lighting accessories that won't interfere with the folding mechanism.
Installation considerations:
- Folding compatibility: Ensure lights don't interfere with the quick-folding handlebar system
- Weight distribution: Add minimal weight to maintain the bike's portability advantage
- IPS display integration: Work around the 2.4" Smart Easy Read Display placement
Installation process:
- Front light mounting: Use the integrated front light as primary illumination
- Quick-release options: Install quick-detach lights that can be removed during folding
- Spoke reflectors: Add lightweight wheel reflectors that don't affect folding
Mihogo LX 4.0 Long-Range Installation
The LX 4.0's dual battery system and robust design make it ideal for comprehensive lighting upgrades while maintaining the impressive 86-mile range.
Advanced lighting features:
- Dual battery power: Leverage the dual 48V 28.8Ah system for high-powered lighting
- Shimano integration: Work around the 7-speed system placement
- Off-road capabilities: Install terrain-appropriate lighting for trail riding
Installation steps:
- Power assessment: Determine available power from the dual battery system
- Mounting preparation: Use the magnesium frame mounting points
- Trail lighting: Install wide-beam lights for off-road visibility
- Battery management: Balance lighting power draw with range requirements
Mihogo RX 2.4 Urban Explorer Installation
The RX 2.4's urban focus and app connectivity make it perfect for smart lighting integration.
Smart features integration:
- Bluetooth connectivity: Sync additional lights with the mobile app
- Urban visibility: Optimize for city riding and traffic conditions
- Compact design: Maintain the bike's sleek aesthetic
Installation considerations:
- App compatibility: Ensure new lights work with the RX 2.4's remote control system
- Urban mounting: Position lights for maximum city visibility
- Theft prevention: Use security-focused mounting systems
Mihogo Air Max Premium Installation
The Air Max's carbon fiber construction and premium features require specialized installation techniques.
Premium installation approach:
- Carbon fiber considerations: Use appropriate mounting hardware that won't damage the frame
- Dual battery integration: Maximize the 1386WH battery capacity for lighting
- Aerodynamic placement: Maintain the bike's performance characteristics
Step-by-Step Installation Process
Tools Required
- Phillips head screwdriver
- Allen key set (2mm, 3mm, 4mm, 5mm)
- Wire strippers (for hardwired installations)
- Multimeter (for voltage testing)
- Electrical tape and zip ties
- Safety glasses and work gloves
Front Light Installation
Standard handlebar mounting:
- Position assessment: Locate optimal mounting position on handlebars
- Bracket attachment: Secure mounting bracket with provided hardware
- Light positioning: Adjust angle for proper road illumination without blinding oncoming traffic
- Beam pattern: The beam pattern should have a flat top and be focused towards the ground, slightly ahead of you on the road
- Testing: Verify light functions properly and doesn't interfere with steering
Integrated system connection:
- Power source location: Identify available power connections from your Mihogo's system
- Voltage matching: Ensure compatibility with your model's electrical system
- Wire routing: Route wires cleanly through the frame or along existing cable paths
- Secure connections: Use proper electrical connectors and insulation
Rear Light Installation
Seatpost mounting:
- Height positioning: Mount within the legal 150cm height requirement
- Visibility angles: Ensure 180-degree rear visibility
- Brake light integration: Connect to the brake system if applicable
- Weather protection: Verify IPX rating matches your riding conditions
Rack-integrated lighting:
- Rear rack utilization: Use existing rack mounting points
- Load consideration: Ensure lights don't interfere with cargo capacity
- Multi-function setup: Install lights that serve as both tail and brake lights
Reflector Installation Guide
Wheel reflectors: Spoke reflectors snap into place between the spokes, providing 360° visibility with high-quality 3M Scotchlite material. Installation involves:
- Spoke positioning: Place reflectors evenly around the wheel
- Secure attachment: Ensure reflectors are firmly seated and won't work loose
- Balance consideration: Install symmetrically to maintain wheel balance
Frame reflectors:
- Strategic placement: Position reflectors on seat stays, chain stays, and front fork
- Legal compliance: Ensure front and rear reflectors meet local regulations
- Visibility optimization: Angle reflectors for maximum light return
Advanced Features and Smart Integration
App-Controlled Lighting Systems
Many Mihogo models feature smartphone integration for lighting control:
- Remote activation: Turn lights on/off via the Mihogo app
- Battery monitoring: Track lighting system power consumption
- Scheduling: Set automatic on/off times based on sunset/sunrise
- Security features: Flash lights as anti-theft deterrent
Battery Integration and Power Management
Power consumption optimization:
- LED efficiency: Choose high-efficiency LED lights to maximize battery life
- Smart controls: Use lights with automatic brightness adjustment
- Battery monitoring: Track power usage to maintain range expectations
- Charging integration: Ensure lighting doesn't interfere with main battery charging
Daytime Running Lights (DRL)
Many modern bike lights feature daytime running modes, helping you to be seen even on the brightest summer days. Installation considerations:
- Brightness levels: Set appropriate daytime visibility levels
- Battery life: Balance visibility with power consumption
- Legal compliance: Ensure DRL systems meet local regulations
Maintenance and Troubleshooting
Regular Maintenance Schedule
Weekly checks:
- Verify all lights function properly
- Clean lenses for optimal light output
- Check mounting hardware for looseness
- Inspect wiring for wear or damage
Monthly maintenance:
- Test battery backup systems
- Verify reflector attachment security
- Clean reflective surfaces
- Update app software if applicable
Common Installation Issues
Power problems:
- Voltage mismatch: Ensure compatibility with your Mihogo's electrical system
- Overload protection: Don't exceed the system's power limits
- Connection issues: Check all electrical connections for corrosion
Mounting challenges:
- Vibration loosening: Use thread locker on critical connections
- Weather exposure: Apply appropriate sealing compounds
- Interference issues: Ensure lights don't obstruct other bike functions
Troubleshooting Guide
Light failures:
- Check battery charge level
- Inspect fuses and circuit protection
- Verify switch operation
- Test voltage at connection points
Reflector problems:
- Clean reflective surfaces regularly
- Replace damaged reflectors immediately
- Ensure proper mounting angle
- Check for obstruction by accessories
Legal Compliance and Safety Considerations
State-by-State Requirements
E-bike lighting laws vary significantly by state, with some key considerations:
- Helmet requirements: Many states require helmets for certain e-bike classes
- Age restrictions: Lighting requirements may vary based on rider age
- Class-specific rules: Different e-bike classes may have different lighting needs
International Standards
European compliance: EN 15194 sets safety requirements for electronically power-assisted cycles, with mandatory lighting requirements including white front lights and red rear lights when riding between dusk and dawn.
Safety best practices:
- Redundancy: Install backup lighting systems for critical safety
- Visibility testing: Regularly test light visibility from various angles
- Emergency preparedness: Carry spare lights and batteries
- Weather adaptation: Adjust lighting for different conditions
Environmental Considerations and Sustainability
Energy-Efficient Options
LED technology advantages:
- Long lifespan: LED lights last significantly longer than traditional bulbs
- Low power consumption: Minimal impact on e-bike range
- Durability: Better resistance to vibration and weather
- Instant activation: No warm-up time required
Solar charging integration:
- Auxiliary solar panels: Small panels can supplement lighting power
- Daytime charging: Charge light batteries while riding
- Environmental benefit: Reduce overall energy consumption
Recycling and Disposal
End-of-life considerations:
- Battery disposal: Properly recycle rechargeable batteries
- Electronic waste: Follow local e-waste disposal guidelines
- Material recovery: Many lighting components can be recycled
Cost-Effective Installation Tips
Budget-Friendly Options
DIY installation savings:
- Basic tools: Most installations require common household tools
- Online tutorials: Leverage manufacturer installation videos
- Group purchases: Coordinate with other riders for bulk buying
Quality vs. price balance:
- Essential features first: Prioritize safety over aesthetics initially
- Upgrade path: Plan for future enhancement capability
- Brand compatibility: Choose accessories that work with Mihogo systems
Professional Installation Services
When to seek professional help:
- Complex wiring: Hardwired systems with multiple integration points
- Warranty concerns: Avoid voiding manufacturer warranties
- Safety critical: High-speed riding applications
- Insurance requirements: Some policies may require professional installation
Future-Proofing Your Lighting System
Emerging Technologies
Smart city integration: Some cutting-edge models feature vehicle-to-vehicle (V2X) communication, allowing e-bikes to communicate with nearby cars for enhanced urban safety.
Upcoming features:
- AI-powered brightness adjustment: Automatic adaptation to conditions
- Traffic integration: Coordination with smart traffic systems
- Health monitoring: Integration with fitness and safety tracking
Upgrade Considerations
Modular systems:
- Expandability: Choose systems that allow for future additions
- Software updates: Ensure compatibility with evolving smart features
- Battery advancement: Plan for improved battery technology integration
Seasonal Adjustments and Special Conditions
Winter Riding Modifications
Cold weather considerations:
- Battery performance: LED efficiency in low temperatures
- Moisture protection: Enhanced sealing for wet conditions
- Visibility enhancement: Additional reflective elements for snow conditions
Summer Optimization
Heat management:
- Thermal protection: Prevent overheating in direct sunlight
- UV protection: Choose UV-resistant materials
- Extended daylight: Optimize for longer riding hours
Conclusion: Maximizing Your Mihogo's Safety Potential
Installing proper lighting and reflectors on your Mihogo e-bike transforms it from a great transportation tool into a comprehensive safety platform. Whether you're commuting on the MIHOGO ONE, exploring urban environments with the RX 2.4, or embarking on long-distance adventures with the LX 4.0, proper lighting installation ensures you're visible, legal, and safe.
The key to successful installation lies in understanding your specific model's capabilities, following legal requirements, and choosing quality components that complement your Mihogo's existing systems. Remember that lighting isn't just about being seen—it's about confident, safe riding in any conditions.
Regular maintenance, proper installation techniques, and staying current with evolving regulations will keep your Mihogo's lighting system performing optimally for years to come. Your investment in proper lighting and reflectors isn't just about compliance—it's about ensuring every ride ends safely.